In this article we’ll show you how to manage various features in Gig Performer related to program change events.
About Program Change messages
.
A program change is a MIDI message traditionally causes hardware synths to change to a different preset (or “patch”).
It is also referred to as a patch change or a “PC”, when talking about MIDI messages. Don’t confuse this with a “Windows computer”.
If you use General MIDI, the PC number indicates a particular sound. Since this standard isn’t obligatory, manufacturers may list patches in any order they wish.
In Gig Performer, you typically send a PC message from your MIDI controller or touch surface to switch to the desired rackspace variation or the desired song part (when you are in the Setlist view).
Use PC events to change rackspaces, not plugin presets
The normal way to use Gig Performer is to create rackspaces each of which contains a collection of plugins connected together as desired. A rackspace might contain everything needed for a single song or you might use several rackspaces during a single song, switching from one to another on the fly. When you develop your gig this way, you get many benefits, for example the ability to switch instantaneously from one set of sounds to another without any glitches or the ability to persist sounds in the old rackspace until you release keys or your sustain pedal (our Patch Persist feature).
Important note: users who are new to Gig Performer, or perhaps just trying it out, but who are familiar with the use of PC messages, may want to change their plugin presets using PC events rather than using the normal rackspace approach. We strongly encourage you to not do that. Many plugins don’t even support this. Please read these blog articles Rackspaces vs Program Changes and Use host automation rather than MIDI to control plugin parameters to learn more.
Refer to this user manual page to learn more about the basic terminology in Gig Performer.
Options related to Program Change events
.
Gig Performer provides you with many options to fully manage PC events.
Count from zero or from one
MIDI PC messages always go from 0 to 127. Since some hardware and software devices count the first program change as PC0 (the range is 0-127) and the others as PC1 (the range is 1-128), Gig Performer allows you to set the starting point for display purposes. You can change this behavior in the Global MIDI Options:
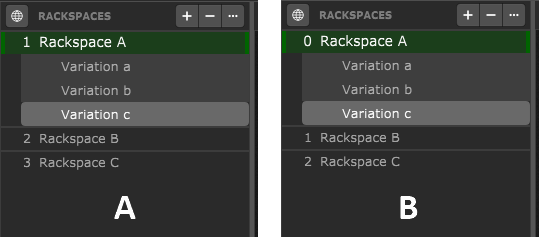
When you turn on the Use zero-based PC numbers toggle button (B), program change numbers will start from 0. Turn off this toggle button to start counting from 1 (A). The results will be immediate. You don’t need to close the Options dialog.
Permanent Program Change numbers
Gig Performer assigns implicit PC numbers automatically to new rackspaces. These PC numbers are not permanent. Example:
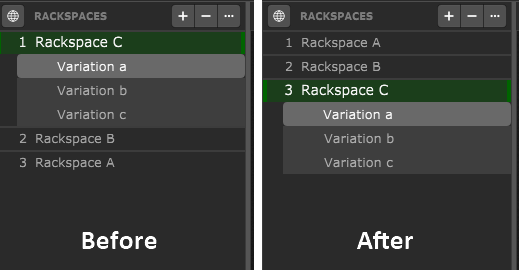
When you click on Edit -> Sort Rackspaces by Name you’ll notice that rackspaces now have different program changes assigned to them.
You can control this behavior by assigning an explicit program change value to a variation, making it permanent. Double click on a variation to open the Variation Properties dialog and enter the desired value. Example:
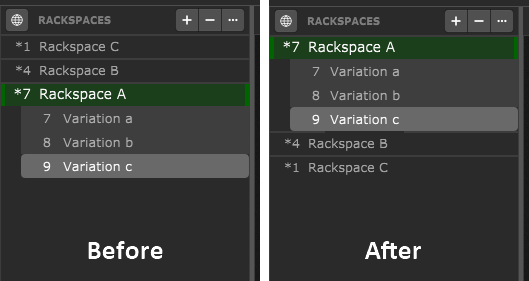
When you click on Edit -> Sort Rackspaces by Name you’ll notice that rackspaces retained the program change numbers.
Note: if an explicit program change number has been assigned to a variation, that number will appear to the left of the variation name. If there is only one variation with a permanent PC number in the rackspace, the program change number will also appear to the left of the rackspace name; if there is more than one variation with a permanent program change, an asterisk will appear there, as well (see the screenshot above).
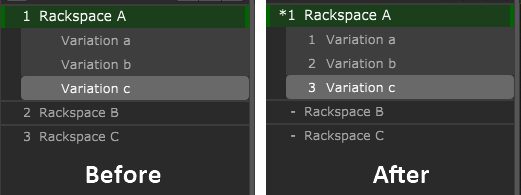
Note: variations cannot share the same program change number. If you manually assign a program change message to a variation, any implicit program change number will be removed and you’ll see the “hyphen-minus” sign as in the screenshot below:
Last selected variation
What may be confusing for new users is what rackspace variation is selected when you send a program change message from your MIDI controller when there is no explicit program change number assigned to this variation. The answer will be the variation that was last selected for that rackspace. Example:

Suppose you send PC 1, PC 2 and PC 3 from your MIDI controller. You can see that the last selected variation is in focus. Always remember that program change numbers are assigned to variations and not to rackspaces.
If you want to always have selected the first variation in a rackspace when you send a program change message from your MIDI controller, turn on the Auto-assign a permanent PC number to new rackspaces (first variation) toggle button in the General Options. If this option is turned on, when you create a new rackspace or duplicate an existing rackspace, Gig Performer will automatically assign the first variation a permanent program change number.
To map a variation to an explicit program change, simply double-click on a variation to open that variation’s properties dialog where you can immediately associate that variation with an explicit program change and bank number. Subsequently sending that program change message to Gig Performer from your controller will cause Gig Performer to switch to that variation. For more information, please see this section of the online user manual.
Unused Program Change messages
Although this is not recommended, Gig Performer allows you to pass unused program change messages (i.e. program change messages that are not assigned to rackspaces) to plugins. Turn on the Pass unused PC messages toggle button in the Global MIDI options to activate this feature. For example, look at this setup:

If you want to change rackspaces 1-3, send PC messages 1-3, respectively. If you send program changes greater than 3, the bundled KeysOfThe70s plugin (which can respond to program changes) will change its programs (see the red rectangle).
Although this feature exists, we recommend that you turn it off, as it may introduce undesired behavior in your rackspace and also for other reasons mentioned in the first section of this article.
Convert MIDI song select messages to program changes
Gig Performer allows you to convert incoming MIDI Song Select messages to Program Changes. You can use them in all Gig Performer options as if they really were program change messages. If your MIDI controller can’t send these messages and you want to experiment with them (or with any MIDI message), we recommend that you use a free tool such as Pocket MIDI (there are versions for both Windows and macOS):
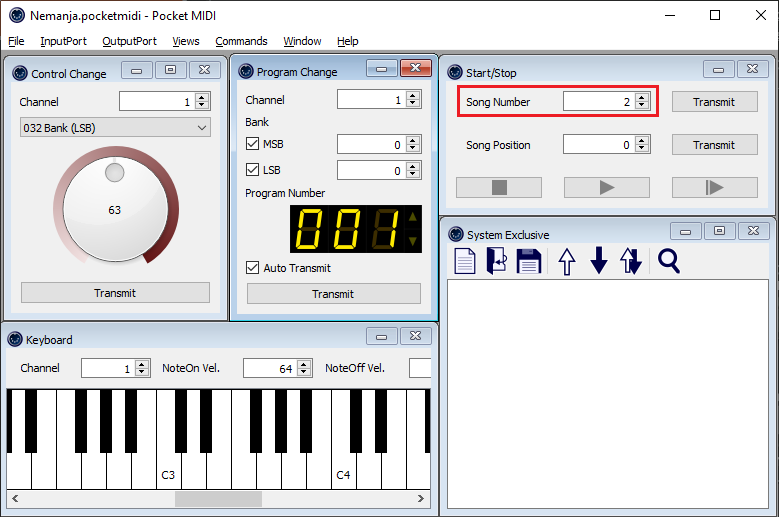
Simply enter the desired value (as indicated with the red rectangle) and click on the Transmit button.
Other options
There are other options related to program change events that you can find in our user manual in the Global MIDI Options and Setlist Options; for example, you can immediately switch to the Setlist view as soon as Gig Performer receives a program change message, or you can control which devices or MIDI channel are allowed to accept program change messages.
How to reset Program Change assignments in rackspaces
.
There are quite a few options in the Edit menu that allow you to perform different operations related to program changes. We have already mentioned sorting rackspaces by name, but you can also choose to sort rackspaces by their program change numbers (simply select Edit -> Sort Rackspaces by PC numbers).
Further, note the Reset Program Change Assignments submenu and expand it. We’ll explain what these options do.
Reset Program Change Numbers (first variation only)
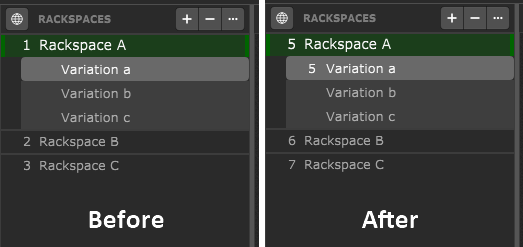
Selecting this menu item will pop up a dialog stating that all current program change assignments will be removed and that new program change assignments will be created for the first variation in all rackspaces, starting with a number that you type in this dialog, for example 5 (optionally, enter the bank select values):
Reset Program Change Numbers (all variations)
Selecting this menu item will pop up a dialog stating that all current program change assignments will be removed and that new program change assignments will be created for all variations in all rackspaces, starting with a number that you type in this dialog, for example 1 (optionally, enter the bank select values):
Reset Program Change Numbers (new bank per rackspace)
Selecting this menu item will pop up a dialog stating that all current program change assignments will be removed and new bank numbers (visit this blog article to learn more about banks) will be assigned to each rackspace, starting with numbers that you type in this dialog, for example, MSB = 0 and LSB = 2:
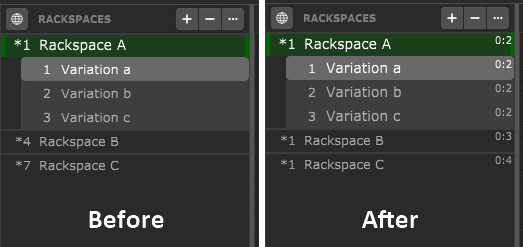
In this example, all variations a, b, c in these three rackspaces (A, B, C), will have PC numbers 1, 2, 3 respectively, but with new bank numbers.
Clear All Program Change Assignments
Selecting this menu item will simply remove all current program change assignments:
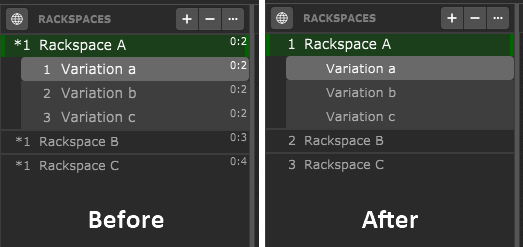
PC numbers are automatically assigned as in the first screenshot in this article.
Managing Program Change assignments in songs and setlists
.
As soon as you switch to the Setlist view, you’ll notice a certain conceptual analogy in program changes assignments between rackspaces/variations and songs/song parts (click here to learn about the song parts and variations relationship). Similarly to rackspaces and variations, PC messages are assigned to song parts and not songs themselves.
Implicit PC assignment
If you don’t specify the desired program changes for song parts, Gig Performer will automatically assign PC numbers:
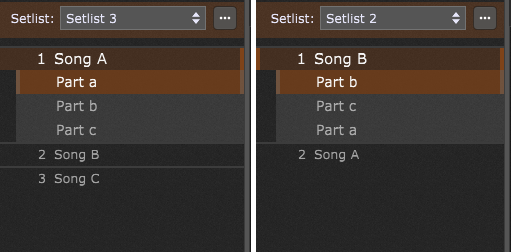
You can rearrange songs in setlists any order you like and they don’t need to have the same PC number across setlists.
Note: when PC messages are automatically assigned and you send a PC message from your MIDI controller, then the first song part is always selected (and not the last selected song part in a song). You can assign the desired program changes for song parts in the Song Part Properties.
Changing PC assignment for a song part
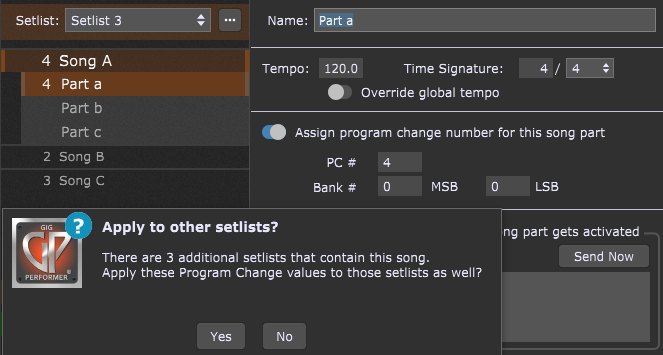
First, when you change a PC assignment for a song part, a dialog pops up. It asks you whether you want to apply that PC for all setlists that contain that song. NB: the default “All Songs” setlist also counts:
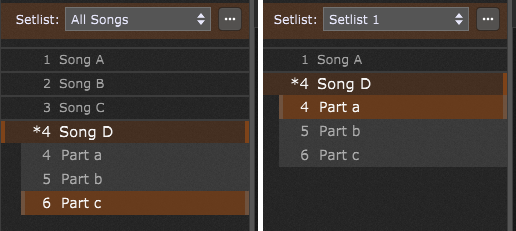
Further, Adding a song to a new setlist will automatically copy PC assignments in the “All Songs” setlist:
Make sure to check out useful operations such as sorting songs by name or by their PC numbers, that are available in the Edit menu.
How to reset PC assignments
You can also reset program change assignments in a similar manner that applies to rackspaces, click Edit -> Reset Program Change Assignments and then select the desired menu item:
– Reset Program Change Numbers (first song part only),
– Clear All Program Change Assignments,
– Sync PC assignments With “All Songs” Setlist,
– Reset Program Change Numbers (all song parts),
Gig Performer 4.5 now allows you to clear all PC assignments in all setlists, as well:
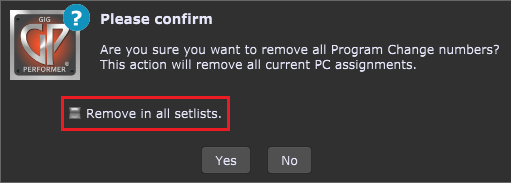
The menu item Sync PC assignments With “All Songs” Setlist is new in Gig Performer 4.5 and it allows you to copy PC assignments from the “All Songs” setlist to all other setlists:

Use this feature if you want to have the same PC assignments for songs in every setlist.
Top 5 Frequently Asked Questions
.
Q: Can I use the same set of PC messages to select parts in any song?
A: Yes, you can. Refer to this blog article to learn more. You can learn CC or Note events, as well.
Q: Can I change rackspaces or songs using widgets?
A: Yes – insert the desired widgets in the Global rackspace and assign the desired System Actions parameter (click here to see the list of parameters). Read this blog article to see an example.
Q: Can I send out PC messages from Gig Performer to hardware devices and other applications?
A: Yes, please see this blog article for the very detailed guidelines.
Q: I’m sending PC messages from my controller but nothing happens. What to do?
A: First check what MIDI messages are coming from your MIDI controller to Gig Performer (if any) using the Global MIDI Monitor. If you don’t see any messages check your cables or MIDI-to-USB adapter if you use one. Suppose the Global MIDI Monitor shows CC or other messages. In that case, you can use those CC messages to change rackspaces (see above). You can also reprogram your MIDI controller to send PC messages (check the documentation of your MIDI device manufacturer). If your MIDI controller sends SysEx messages, you can convert them to CC messages using a Gig script. See an example here.
Q: Pressing my USB footswitch simulates a letter on my computer’s keyboard. Can I change rackspace with it?
A: Yes! Read this blog article to see how Gig Performer provides you with the most powerful and flexible MIDI processing. In the article is a simple script with which you can use a key on your computer’s keyboard to switch rackspaces. NB: and lots more, for example you can convert PC messages to CC messages in a gig script.
If you have any questions or thoughts, please visit this Community thread.
.
Share this article to support Gig Performer and spread the word! 🙂
Own the Stage® with Gig Performer®
Nemanja Pudar
.
Related topics:
– How to change sounds and control plugins from your MIDI controller
– The most flexible MIDI processing
– How to send PC messages out to hardware devices and other applications
– How to automate switching rackspace variations and song parts using the MIDI File Player
– Questions about Rackspaces and Variations


